
How to Get Verified on Instagram
Instagram verification uses two official routes: a paid Meta Verified subscription or a free notability-based badge application. Confirm the route’s eligibility requirements, match your identity and account details to its rules, submit through Instagram or Meta, then check the official status or subscription screen for the outcome.
A verified badge is an identity check, not a marketing goal, and treating it like a growth reward leads to wasted subscriptions, exposed documents and scams. This guide separates the two official paths — Meta Verified and the notability-based application — so you can work out which one your account can actually use before touching a settings menu. It also covers the identity and account details each path checks, how to read what your account shows back once you apply, and why follower counts and Reels performance sit outside the eligibility conversation entirely.
How to get verified on Instagram
Getting verified on Instagram means completing one of two official processes that Instagram documents directly: a paid Meta Verified subscription, or a free application for a notability-based badge. This guide breaks both into the same four-step framework — route, eligibility, submission, outcome — so you check the right conditions before acting rather than assuming a good account is enough on its own.
- Identify which official route applies to you. Meta Verified covers individual creators and businesses through separate subscription products; the free application exists only for public figures, celebrities and brands Instagram already treats as notable. Each route carries different eligibility conditions rather than being interchangeable options, and the next section walks through choosing between them.
- Confirm the route’s identity, activity and payment conditions before submitting anything. Meta Verified’s creator and business products each carry their own age, country, account-type and documentation rules; the free application instead checks whether your account is authentic, unique, complete and demonstrably notable. Reading the wrong checklist is the most common reason people submit and then wait for an outcome that was never possible.
- Complete the enrollment or request inside Instagram itself. A Meta Verified subscription is set up and paid for through Meta’s own product; the free badge uses a request form asking for your name and identification, with no payment step. Never complete either process through a link, message or third party.
- Check the actual outcome rather than assuming a screen means the process finished. Confirming you submitted a request isn’t the same as receiving a decision. Menu placement, request labels and available options shift by account type, region and app version, so treat the paths ahead as a starting point rather than a fixed map.
Choose the official route that matches your account
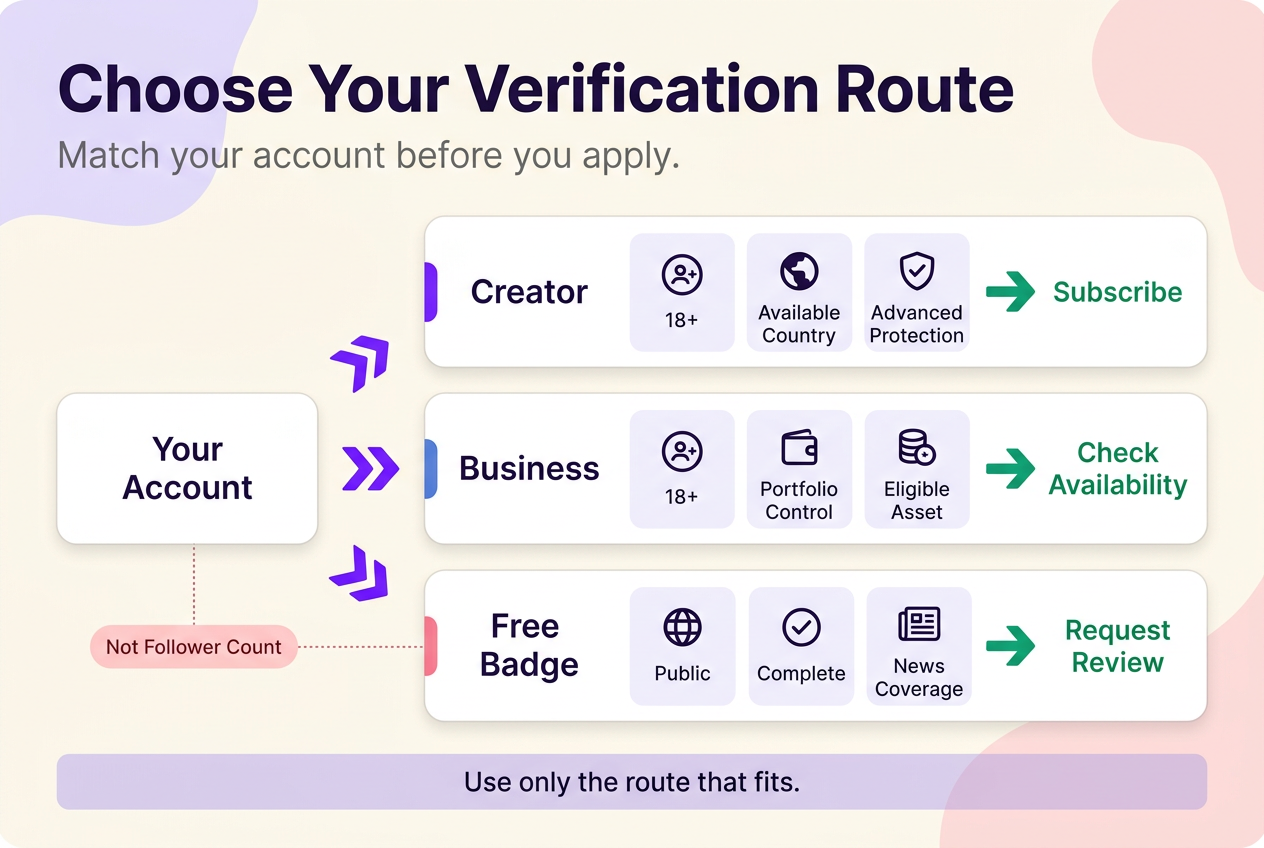
The usual advice to “just apply for verification” breaks down here. Instagram documents two official badge routes — Meta Verified and a notability-based badge application — and Meta Verified itself splits into separate creator and business eligibility products. A creator with a personal or professional account, a registered business running its own Meta Business Suite portfolio, and a public figure who believes their profile meets Instagram’s notability bar are each pointed at a different product, and applying through the wrong one wastes the submission.
Meta Verified for creators is built for an individual running an eligible personal or creator account. Instagram’s Meta Verified creator eligibility documentation lists an applicant age of at least 18 (or the age of majority), location in an available country, a government-issued photo ID, Advanced Protection turned on, and a minimum posting history, alongside compliance with Instagram’s Terms of Use and Community Standards.
Meta Verified for businesses is a separate product built around an existing business, not an individual. Meta’s eligibility documentation for Meta Verified for businesses requires the same age threshold, a country where the business product is offered, and full control of a Meta Business Suite portfolio containing an eligible asset such as an Instagram business account. That availability isn’t guaranteed everywhere the creator product exists, so confirm it for your account rather than assuming it.
The free application is the only route with no subscription attached. Instagram’s verified-badge requirements reserve it for public figures, celebrities and brands that meet authenticity, uniqueness, completeness and notability standards — notability meaning the account represents a well-known, highly searched-for person, brand or entity, reviewed against coverage across multiple news sources. That bar sits above simple recognition within your own niche.
| Route | Who it fits | What to confirm first | Identity being checked | Next official action |
|---|---|---|---|---|
| Meta Verified (creator) | An individual running a personal or creator account | Age, country availability, Advanced Protection, posting history | The account holder | Review the creator eligibility page, then start the subscription if every condition is met |
| Meta Verified (business) | A registered business with its own Meta Business Suite portfolio | Age, whether the business product is available in your country, portfolio control | Portfolio control and eligible business assets — not simply administrator access | Confirm business-product availability before starting a business subscription |
| Free badge application | Public figures, celebrities and brands already covered as notable | Authenticity, uniqueness, completeness and notability | The named public figure, celebrity or brand | Submit the in-app request with identification once every prerequisite is met |
The decision rule is simple: choose only the route whose current requirements match your account and identity situation. The free application only fits when you can point to existing coverage across multiple outlets, since Instagram’s notability standard is built around that kind of recognition, not audience size. Business Meta Verified only enters the decision once a Meta Business Suite portfolio already exists — building one solely to chase a badge reverses the order that actually makes sense.
What the verified badge confirms—and what it does not
A verified badge is Instagram’s confirmation that an account is the authentic presence of the person or brand it claims to be, based on activity across Meta’s products and the information or documents submitted — not a judgment on the account’s content, popularity or conduct going forward.
Meta states directly that the badge is not a symbol of importance, authority or subject-matter expertise, and it isn’t Meta’s endorsement of the account. Reviewed Instagram and Meta documentation describes authenticity, account support and impersonation protection as the badge’s function; it doesn’t describe verification as changing how content ranks, how far Reels travel, search visibility, reach, engagement or sales. Treat the badge as an identity marker your audience can check, not as a growth mechanism.
Prepare the identity and account details the route requires
The most common preparation mistake is treating “my identity” as one fixed thing across every route, when Instagram’s documentation checks different identities depending on which product you use. The documentation does not treat account control, an administrator’s identity and a business entity’s identity as interchangeable, so check which route and documentation apply before submitting identification.
For the free badge application, Instagram’s requirements ask that the account be authentic, unique, complete and notable — completeness meaning the profile is public, has a bio and profile photo, and is active when you apply. The request form itself asks for a full name and identification, such as a government-issued photo ID or official business documents, with no payment step anywhere in that flow.
For Meta Verified, the identity check runs through the subscriber: Meta says applicants may be asked for government-issued ID and, in some regions, a selfie video to confirm who they are. For a business subscription, eligibility is evidenced through control of an existing Meta Business Suite portfolio containing an eligible asset — not through the personal ID of whoever happens to have administrator access.
Whose identity is the flow asking you to verify?
For example, picture a marketing manager with full admin access to a boutique’s Instagram business account: Instagram’s documentation does not treat that manager’s personal ID as equivalent to the business’s portfolio-control and eligibility requirements. Confirm which one the selected route actually checks before you gather or submit any document.
Start the current official flow in Instagram settings
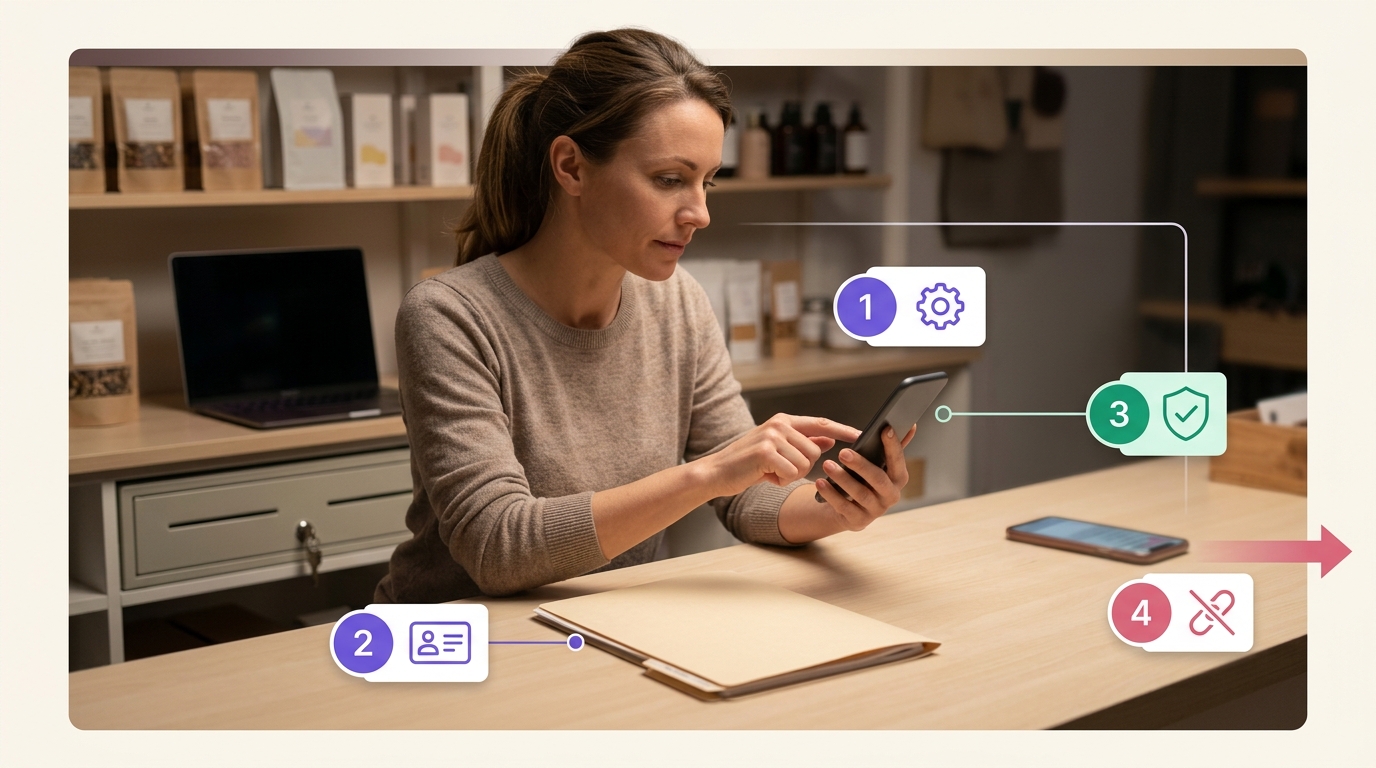
You start the free badge application by finding “Request verification” inside your account settings, and you start a Meta Verified subscription through the Meta Verified product itself. Both are native controls — never a link in a message, a third-party site, or a direct message from someone offering to submit it for you.
For the free application, Instagram documents the “Request verification” control from profile or menu settings; on professional accounts it can sit under an account-type or creator-tools section, and a separate Help Center path places it under Settings, then Preferences, then Request verification. Once you find it, complete the form with your name and identification and submit it for review.
For Meta Verified, start inside Instagram or Meta’s own product by looking for “Meta Verified” in settings or the subscription entry point; exact placement varies by account, region and rollout. Once a subscription is active, it’s viewed and managed through Account Center, alongside its associated verified profile and benefits. If you don’t see the option, treat that as a signal to recheck eligibility and availability — not a reason to use an external link or a listing you found elsewhere.
Menu labels, exact navigation and which options even appear can vary by app version, account type and region, so use the feature names above as search terms inside the app rather than a fixed click-path.
Follower milestones are not a verification checklist
Chasing a follower milestone before applying is a common but misplaced strategy: reviewed Instagram and Meta documentation lists no specific follower count, Instagram Insights figure, reach, engagement rate, audience size or Reels-performance number as eligibility for either Meta Verified or the free badge. Follower growth, reach and engagement stay useful as measures of your own audience, but none of them substitute for the identity, activity and notability conditions each route actually checks.
Check account status, security, and profile conditions
Posting more or growing your audience won’t fix a security or eligibility gap, and the two problems need different checks. Low reach or a smaller following isn’t evidence of a restriction — that conclusion needs an actual status or eligibility message from Instagram, not a guess based on performance.
Before applying, confirm your account is public, complete and active, since the free application checks exactly that. Meta Verified’s creator eligibility separately requires Advanced Protection to be turned on, which sits alongside — not instead of — Meta’s general account-security guidance: two-factor authentication, protecting your password and login codes, and staying alert to phishing attempts. Turning on stronger protection is worth doing regardless of which route you choose.
Check the result and fix the status you see
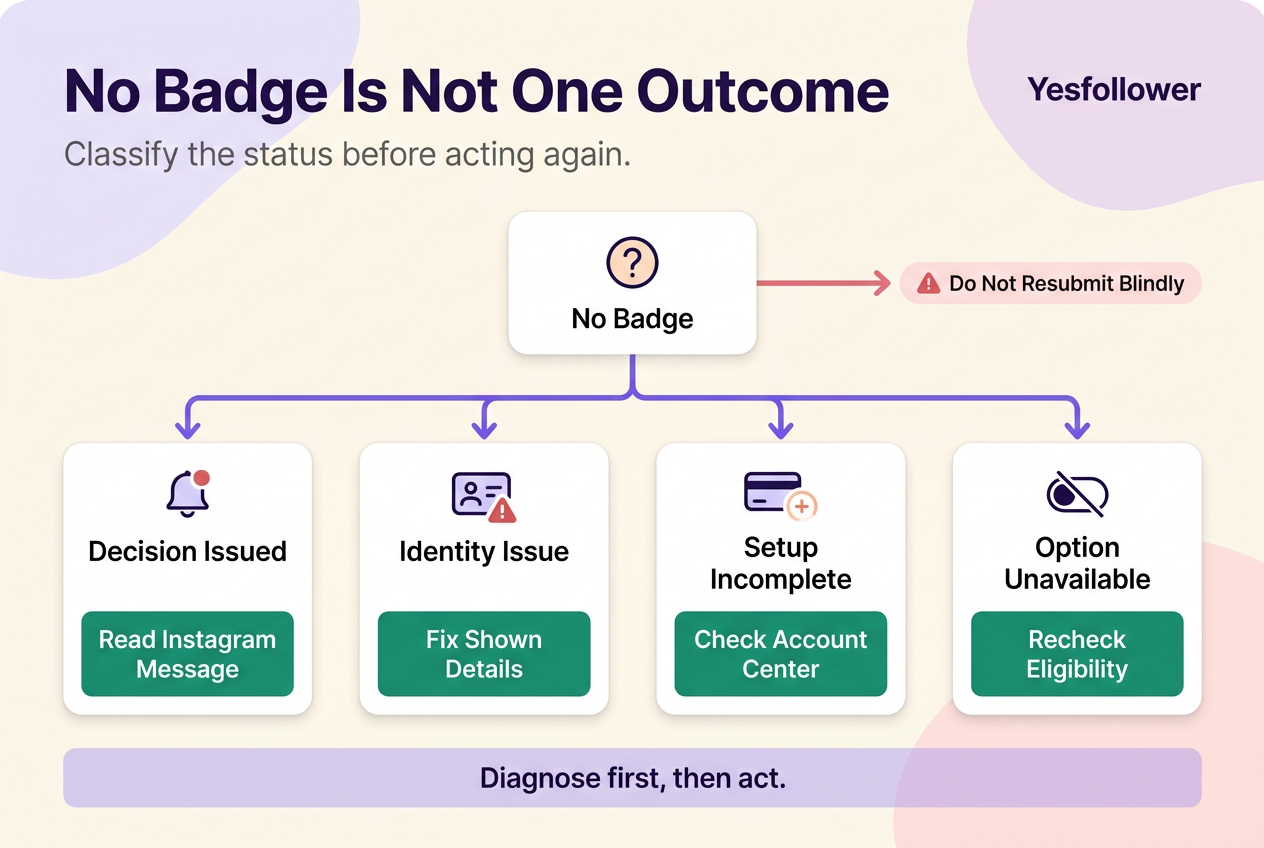
No badge doesn’t automatically mean rejection. It can also mean the request is still with Instagram, that enrollment never fully completed, or that the route itself isn’t available for your account yet — and each of those calls for a different next step rather than a repeat submission.
- An official decision has been issued. Instagram’s own messaging about your request is the only reliable signal of a decision; treat anything else as still pending.
- An identity or information issue is flagged. If Instagram’s request flow shows a specific issue with the information or documents you submitted, address exactly what’s shown before submitting again.
- A Meta Verified subscription is incomplete. Check the subscription status inside Account Center, where an active Meta Verified subscription is viewed and managed, to see whether payment or setup actually finished.
- The route itself isn’t available yet. A missing option is an availability or account-type limitation, not proof your account was rejected — recheck eligibility before concluding anything.
Resubmitting the same request without identifying which of these four states applies just repeats whatever caused the first attempt to stall.
Ignore sellers, agents, and messages that promise verification
Paying someone who messages you offering to “get you verified faster” is one of the most damaging mistakes available here. The safe rule is operational: start verification only by independently opening Instagram or Meta’s own Help Center, never through a link, DM or offer someone sends you. The only legitimate paths are the ones described above.
Never share your password or a login code with anyone claiming to process a verification request — that’s enough information to lock you out of your own account. If an account is impersonating you or your business while this is happening, Instagram’s impersonation reporting form is the documented channel for that, separate from the badge process itself.
If you cannot use a route yet
Generic fixes like posting more, buying ads, or reapplying immediately don’t resolve a route-specific blocker — each blocker needs its own fix. If a route shows no option at all, recheck its documented availability for your account type and country before assuming it’s closed permanently. If your submitted identity or business records don’t match your profile, correct the mismatch rather than resubmitting the same documents. If a security or Advanced Protection condition is unmet, address that setting directly. And if the real gap is notability itself — no route currently fits a profile with limited outside coverage — that’s a recognition question rather than a verification-process one; outside that scope, the Instagram Growth hub covers building that kind of sustainable audience presence.
 120,000+ creators say yes
 Real Active Accounts


 Username Generator
  Hashtag Generator
  Font Generator